The Switchboard Client
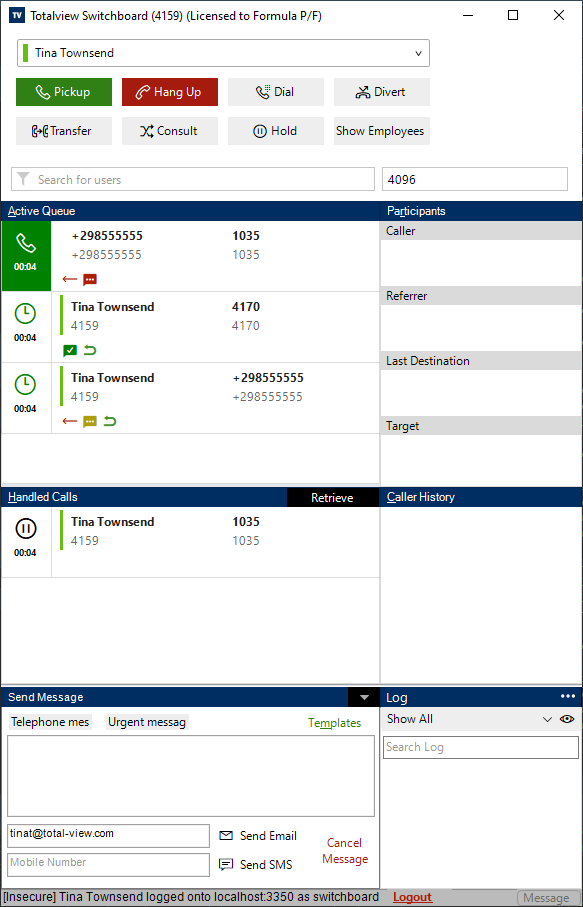
The Switchboard client enables the user to handle incoming calls by using the various information presented when the call arrives at the switchboard.
My state and settings are at the top of the switchboard. It is used to control the state, reservation and other settings of the logged in user. As well as some other setting.
The available call control functions are listed below My state and settings. These functions are used to control incoming and outgoing calls.
The Search enables intelligent search function and the Number fields shows what number is actually called.
The Active Queue lists all calls at the switchboard, and when selecting a call in the Active Queue details about the call and the Caller history is presented to the user.
Calls on hold and calls Transferred to other users are listed in the Handled Calls list. The user can retrieve the calls from the list to the Active Queue.
When handling a call, messages are automatically constructed based on predefined templates. This makes it quick to send email or SMS messages to users.
The Call log lists the handled incoming and outgoing calls.
My state and settings
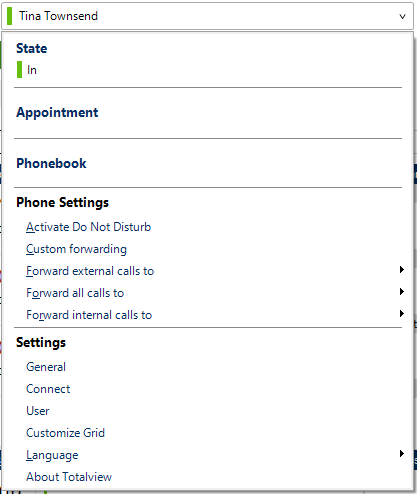
The My state and settings menu give the switchboard/contact center easier access to change the settings of the logged in user, as well as some other options.
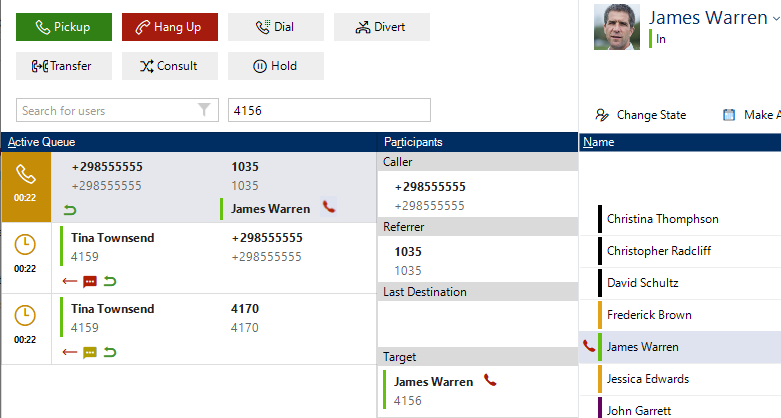
The call control functions
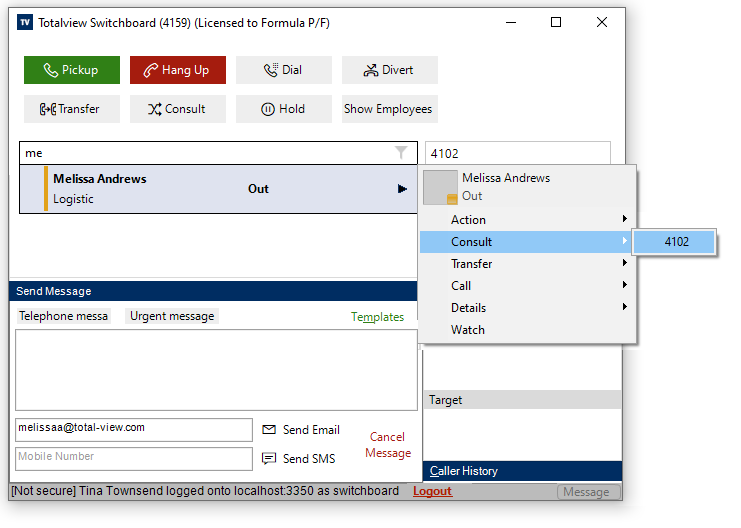
The call control functions are listed at the top of the switchboard and above the Handled Calls list. Some of the call control functions are also available in the pop up menu of the users in the user grid.

Pickup (Numeric Enter) |
Answers the alerting call on the switchboard device. |
Hang up (Numeric -) |
Clears a connected call on the switchbaord device. |
Dial (Numeric ,) |
Dials the number in the Number field. When using Konnekta, right clicking on the dial button lets the user choose which of the available outbound caller ids to show when making a new call. |
Dial Mobile (Shift + Numeric ,) |
Dials the default mobile number of selected user. |
Transfer (Ctrl+ Numeric +) |
Transfers a connected call to the number in the Number field. |
Consult (Numeric+) |
Consults a connected call to the number in the Number field. |
Hold (Numeric *) |
Puts a connected call on hold. |
Divert |
Diverts a call to the number in the Number field without answering the call first. |
Show/Hide Employees (Ctrl-Alt-S) |
Shows/Hides the right part of the client (i.e. the basic client part) |

Retrieve (Numeric /) |
Retrieves a call previously put on hold or deflects if transferred. Also used to cancel a consultation and retrieve the original call. |
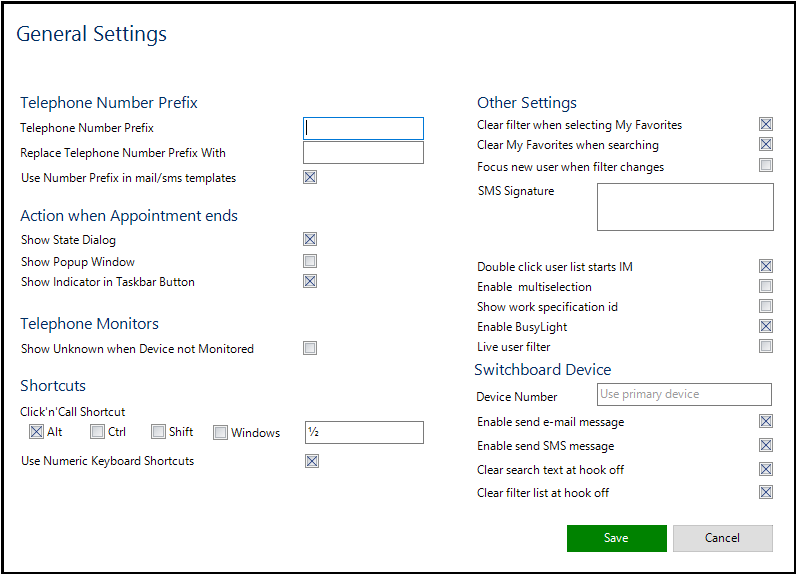
At default the numeric keyboard is activated as switchboard shortcuts. This can be deactivated from the General settings menu.
The search and number fields
The search field has the same functionality as the client Quick filter (See Quick filter under the user grid). When searching for a user and a result is found, the found users default local number is listed in the Number field.
The number field always shows the number that will be called, transferred to or consulted.
Pressing the Alt+Down arrow on the keyboard while in the Search field lists all other contact numbers registered to the found user. Select one to change the Number field.
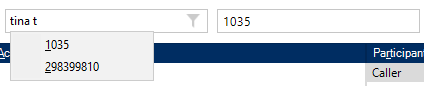
A number entered in the Search field can be copied to the Number filed by pressing Alt + Up arrow on the keyboard.
Pressing the Up / Down arrow on the keyboard while in the Search field will select the previous/next user in the current userlist.
The active queue and call information
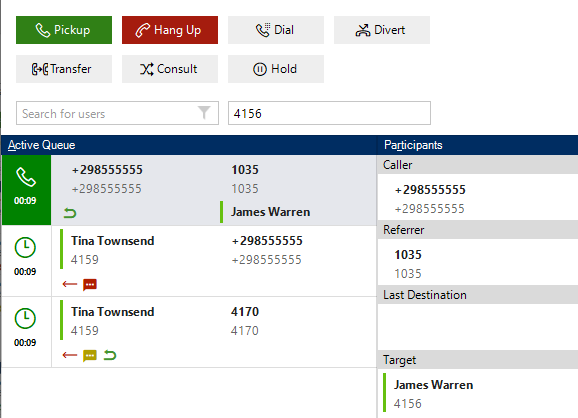
Calls arriving at the switchboard device are listed in the Active Queue. Calls can be picked up from the Active Queue by double clicking the call.
Selecting a call shows the Caller and Referrer information, if known. If the call has been travelling on the HiPath, the Last (known) destination is also shown.
Click on Caller or Last Destination to get access to the phonebook shortcut.
Selecting a call in the active queue also lists the Caller History.

The caller history lists users who previously have accepted calls from the caller.
By using this information, the switchboard user can suggest an alternate user if the requested user is busy.
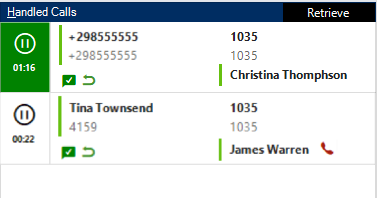
The Handled calls
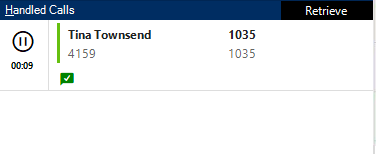
The Handled calls lists calls on hold on the switchboard device, and calls transferred to other users by the switchboard.
Held calls shows the referred users state and phone state and can this information be used to determine if the referrer is ready to accept the call. Cals on hold can be retrieved by using the Retrieve button.
Transferred calls are listed as long as they are not answered by the user they where transferred to. As long as the receiver has not answered them, the calls can be deflected back to the switchboards active queue by using the Deflect button.
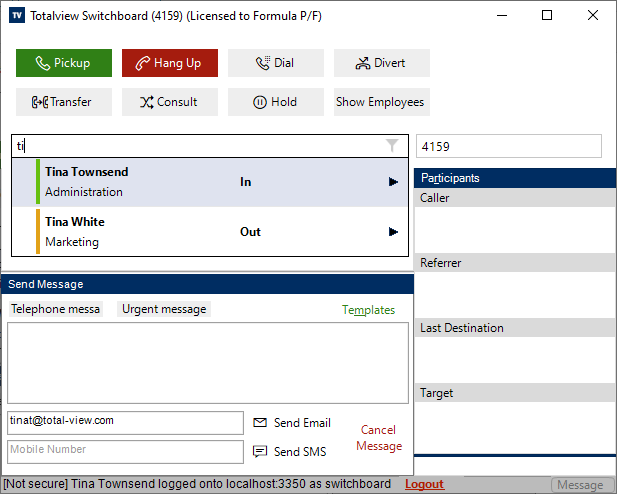
Sending messages
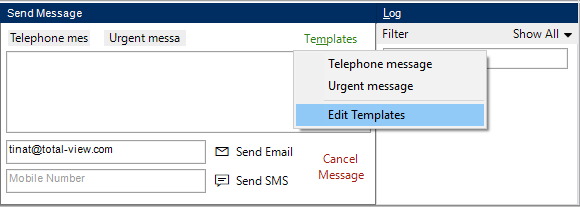
If a call can not be transferred to the requested user, a message can be sent to the user instead. Messages can be sent using email or sms.
Messages can be based on predefined templates or written directly into the message box. If the message is based on a template, additonal text can be added to the message.

When using a template, known information such as caller number and name can automatically be added to the message and thus limiting the need to manually add extra information to the message box.
If Telephone Number Prefix is used to remove prefix from listed numbers, then the prefix is also removed when the message is created. E.g. +298344095 is changed to 344095.
To access the templates, click on the Templates button.
Configuring templates
There are two types of templates. A message template is used to generate an e-mail or SMS message. A Start Program Template is used to start an external program.
To configure a template click on the Templates button in the lower left corner and select Edit Templates to start the Configure Template dialog:
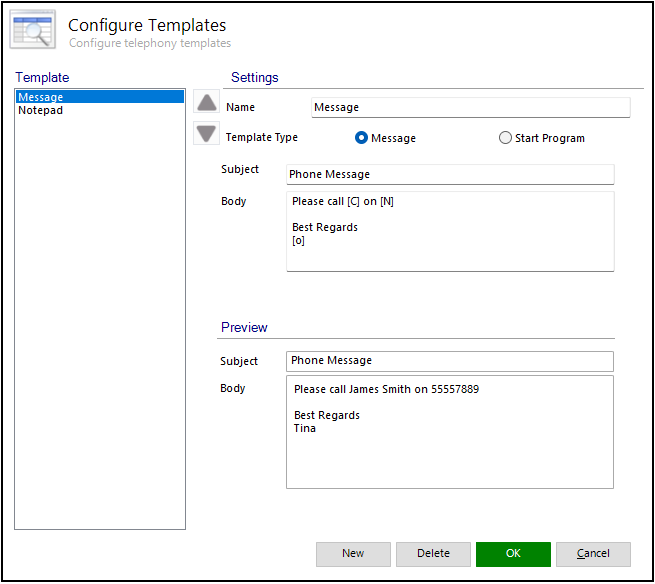
Either click New and enter a name for the template or select an existing template in the Template List to modify it.
Select Template Type: Message or Start Program
Message Template
To add/modify a Message Template: Select Template Type: Message. Enter a subject and body text. A preview of the message is shown at the button.
If the message is sent as an SMS message the subject and body will be combined to a single message.
The following substitutions can be used in the subject and body:
[N] Incoming number
[C] Caller – full name
[O] Operator’s – full name
[o] Operator’s – first name
[D] Today’s date
[T] Time of call
Please note that the codes are case sensitive.
When you configure messages, be sure to make the message short and precise. If the messages are too long, essential information as the caller’s telephone number tends to disappear in the information flow, especially when sent to mobile devices.
Start Program Template
To add/modify a Start Program Template: Select Template Type: Start Program:
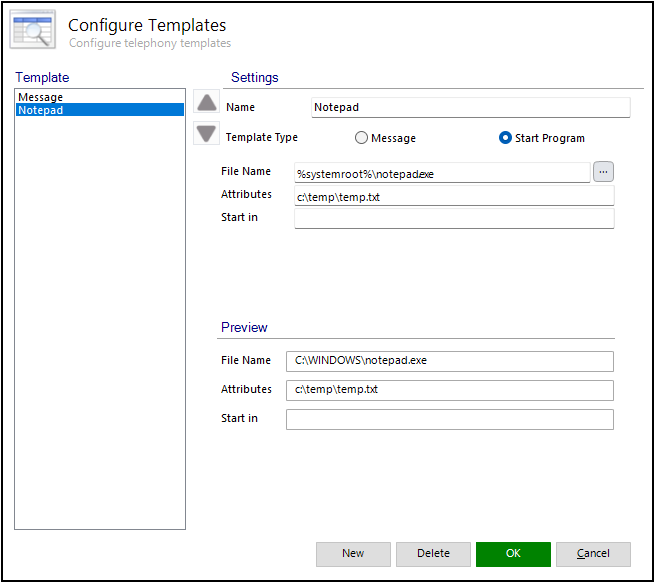
Enter filename, Attributes and a start-up directory.
Start the template program by selecting the caption in the template list or click the caption button. The caption buttons show the first 3 defined templates.
The example above will start notepad and load the temp.txt file.
The following substitutions can be used as attributes to the loaded program:
[N] Incoming number
[C] Caller – full name
[O] Operator’s – full name
[o] Operator’s – first name
[D] Today’s date
[T] Time of call
Please note that the codes are case sensitive.
Windows environment variables can also be used for example %ProgramFile% is the program files folder. For a complete list of environment variable start a command prompt and enter set [Enter].
The Log
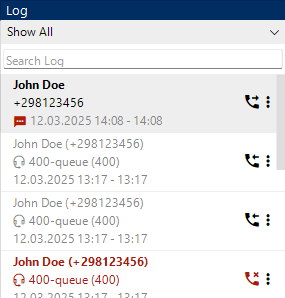
The log shows ended calls.
When an ended call is selected Participants, Caller History, and Send Message sections are updated to show the information related to the selected item. If you have started to write a message but have not sent it yet, this is indicated with a red speech bubble icon.
Searching can be done by entering a search text into the text field, you can also click on the down chevron to select between incoming only, outgoing only and all calls.
We always attempt to link ended calls with call log entries to ensure a uniform way of displaying relevant data.
Unlinked Calls
When it is not possible to link the calls, the display format is:
1st line: The caller’s name (if available); otherwise, the phone number.
2nd line: The recipient’s name (if available); otherwise, the phone number.
3rd line: The start and end date of the call.
Linked Calls
When the calls are successfully linked, the display format is:
1st line: The name of the calling/called person.
2nd line: The phone number of the calling/called person.
3rd line: The start and end date of the call.
Note
Calls Distributed Through a Queue
When a call is distributed via a queue, the display format is:
1st line: The name and number of the caller or recipient.
2nd line: The name and number of the distributing queue.
3rd line: The start and end date of the call.
Wait for Idle
The switchboard (SB) can put a call on Hold and mark it as waiting for a user’s phone state to change to Idle. When the phone state changes to Idle, the held call is highlighted to inform the SB user that the user’s phone is Idle.
Changes in the Totalview switchboard
When a call is put on Hold on the Switchboard, the marked user’s phone state is monitored and when the phone state changes to Idle, the call is highlighted.
The following information is listed for a held call:
The marked users name, current state and current phone state
The number of seconds the call has been on hold
When the marked users phone state is Idle, the call is highlighted in a light green color
Marking a user and put the call on hold
Before putting the call on Hold, the user of interest must be selected and mapped to the call. This is done by using the Search functionality or selecting the user from the user list.
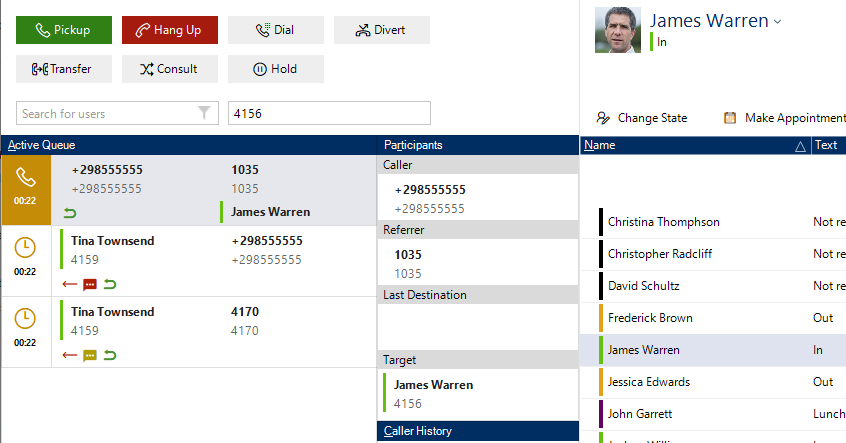
The user of interest is listed on the call. In the example below it is James Warren and we can see that his phone is currently busy.
Handle the call on hold
When the marked user’s phone state changes to Idle, the call on hold is highlighted to inform the SB that the call is ready to handle.
Select the call from the Handled Calls list using the Alt+H shortcut and then Ctrl+Enter shortcut. This will turn the held call into the active call on the SB device. The user can also double click on the held call.
Do notice: If there is more than one call in the Handled Calls list then use the arrows to select the one of interest before using the Ctrl+Enter shortcut.
To be able to consult the call to the marked user, the call must be selected in the Active Queue. Use Alt+A shortcut and then F4 shortcut to select and consult the call to the marked user.