The External Calendar Integration
The Totalview 2017 users can be synchronized with external calendar system such as Microsoft Exchange Server.
When synchronized, appointments changes in Totalview 2017 is reflected in the external calendar system, as well as changes in the external calendar system is reflected in Totalview 2017.
If the external calendar integration is enabled, the following icons in the Appointments view indicate the state of the synchronization.
Indicator |
Description |

|
The appointment is set for synchronization, but is not yet synchronized. Waiting for the result from the external calendar. |

|
Any appointment changes are synchronized, but currently the connection to the external calendar connector is not running. |

|
The appointment is a recurring appointment, synchronized from the external calendar system. |
Red line |
A red line at the bottom of the Appointments view indicates that the external calendar connector is not running. |

|
This icon indicates that there is a synchronization error for this particular user. The icon is accompanied by an error message with further information. |
The Exchange synchronization
In Totalview an appointment is regarded as a reservation and will be activated when the time occurs.
Appointments made from Outlook are shown in Totalview and appointments created in Totalview are synchronized with Outlook.
If an appointment, originally made from Outlook is changed/deleted in Totalview, the appointment will be synchronized/deleted in Outlook. However moving a recurring occurrence before or after another occurrence in the same recurring series will fail.
Creating appointments in Outlook
In Microsoft Outlook an appointment is made in the calendar function. If you want the appointment to be registered in Totalview make sure the status code in the appointment is either “Busy” or “Out of office”.
The subject and location field of the appointment created in Outlook will be displayed in Totalview. The body field of the appointment will not be displayed in Totalview.
If an appointment should not be synchronized with Totalview, one of the following methods can be used:
Set the status code of the appointment to “Free” or “Tentative”
Put an asterix * first in the subject field (* is the default setting but can be changed in the calendar connector setup)
Private appointments in Outlook
When an appointment is marked as private in Outlook, it is shown in Totalview as normal, except the text will be “Private appointment”.
If an appointment is marked as private in Outlook and the private flag is removed, the text in the corresponding Totalview appointment is changed to the subject text in Outlook. If an appointment changes from public to private in Outlook the text in Totalview changes to “Private appointment”.
If an attempt is made to modify the text of a private appointment from Totalview the text changes to Private again. All other functions, such as telephone forwarding and changes in state, are unaffected.

The Lotus Notes synchronization
In Totalview an appointment is regarded as a reservation and will be activated when the time occurs.
Appointments made from Lotus Notes are shown in Totalview and appointments created in Totalview are synchronized with Lotus Notes.
If an appointment, originally made from Lotus Notes is changed/deleted in Totalview, the appointment will be synchronized/deleted in Lotus Notes. However Recurring appointments made from Lotus Notes cannot be changed from Totalview. It is however possible to delete recurring appointments from Totalview.
When creating a Lotus Notes calendar entry of type AllDayEvent, Appointment or Meeting, the user can select categories for the entry.
By default, all calendar entries from Lotus Notes are mapped to the one and same template in Totalview.
With the usage of category synchronization, the selected category in the Lotus Notes calendar entry can be used to specify what template to use for the appointment in Totalview, e.g. that the category Sick in Lotus Notes should be mapped with the template Sick in Totalview.
The mapping information is also used when synchronizing Totalview appointments with Lotus Notes, e.g. that an appointment created in Totalview with the state Sick will be created as a calendar entry in Lotus Notes with the category Sick.
Creating appointments in Lotus Notes
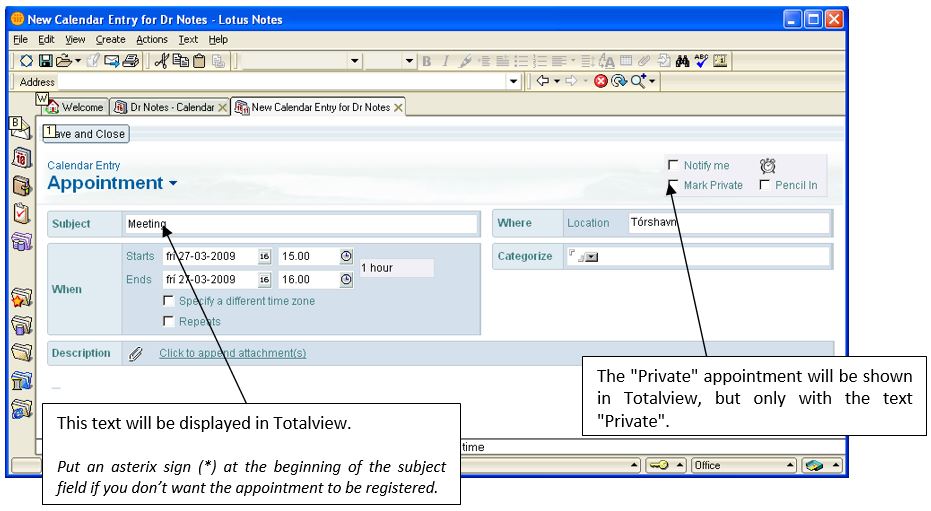
In Lotus Notes an appointment is made in the calendar function.
The subject and location field of the appointment created in Lotus Notes will be displayed in Totalview. The body field of the appointment will not be displayed in Totalview.
If an appointment should not be synchronized with Totalview, one of the following methods can be used:
Set the status code of the appointment to “Free” or “Tentative”
Put an asterix * first in the subject field (* is the default setting but can be changed in the calendar connector setup)
Private appointments in Lotus Notes
When an appointment is marked as private in Lotus Notes, it is shown in Totalview as normal, except the text will be “Private appointment”.
If an appointment is marked as private in Lotus Notes and the private flag is removed, the text in the corresponding Totalview appointment is changed to the subject text in Lotus Notes. If an appointment, changes from public to private in Lotus Notes the text in Totalview changes to “Private appointment”.
If an attempt is made to modify the text of a private appointment from Totalview the text changes to Private again. All other functions, such as telephone forwarding and changes in state, are unaffected.
Setting phone forwarding in the appointment’s subject
When synchronizing appointments with Totalview, the “Busy” and “Out of Office” template set in the calendar connecter, or the #TemplateID in appointment’s subject, determines where the default local phone is forwarded.
If the phone should be forwarded elsewhere the code #X telephone number# can be added to the subject field of the appointment.
X can be one of the characters a, e, i or n. The letters are case insensitive.

The rest of the text between the ## is the telephone-number. If you write default or nothing, the telephone will be forwarded to default.
Examples of subject forwarding codes

Selecting a template in the appointment’s subject
When synchronizing appointments with Totalview, the “Busy” and “Out of Office” template set in the calendar connecter determines the default templates to use.
If another template should be used the #TemplateID can be added to the subject of the appointment. The #TemplateID must be the template ID and the template must be allowed as appointment.
Examples of subject template selections

Appointments synchronised using #TemplateID are saved in Totalview and can be viewed in Totalview reports.