The User View
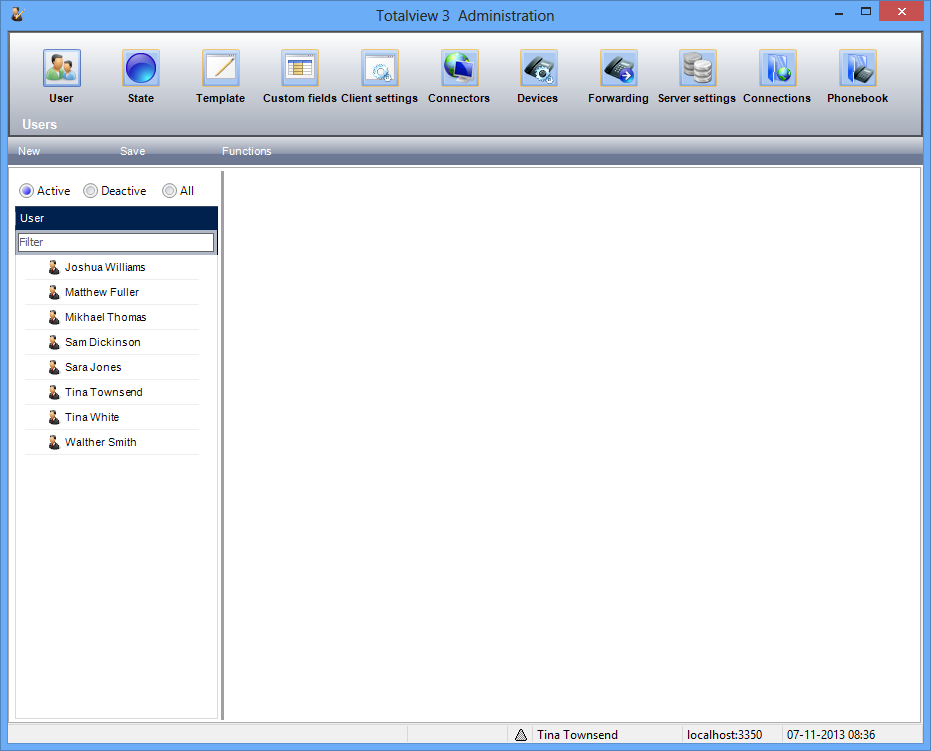
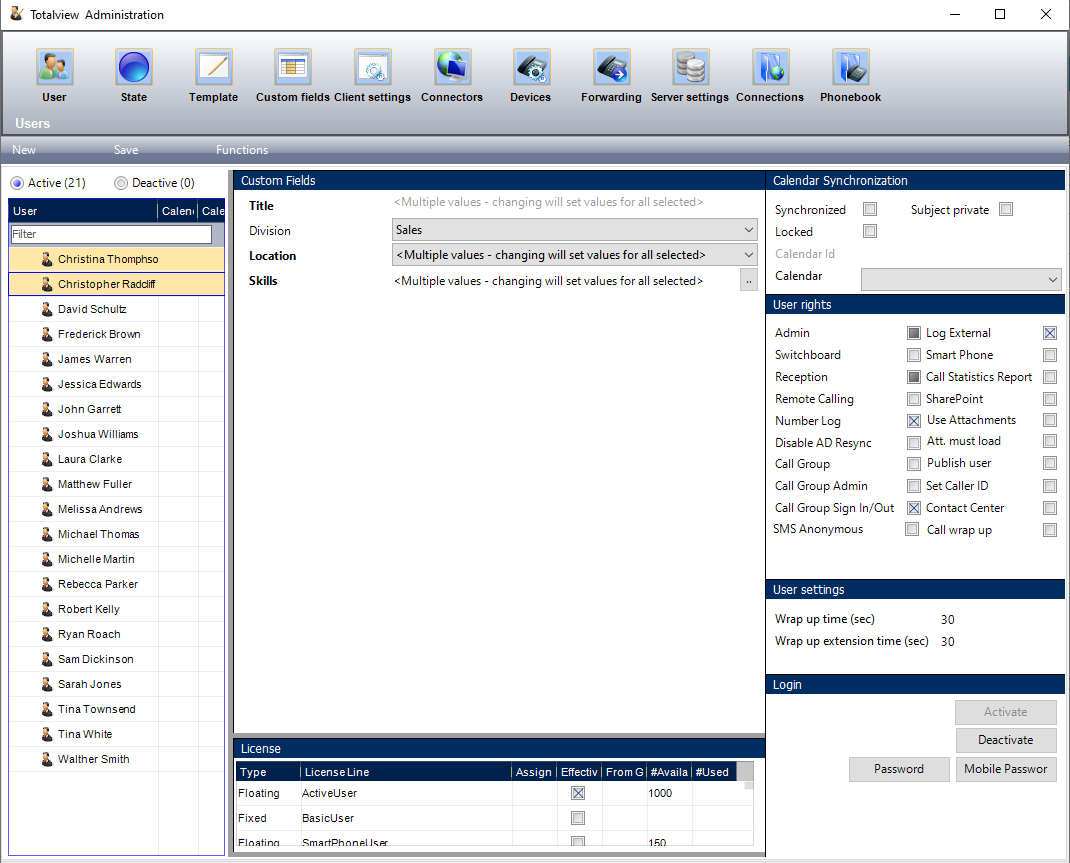
The Users view gives you an overview of all the Users in the system. Here you can add, edit, activate, deactivate and delete User information. The left section lists all the activated/deactivated users. The right section shows detailed information about each selected user.
Default the names are listed with the first name first. You can also search for Users in the Search field above the Users. Use the radio buttons above the search field to view active, deactivated or all users.
User list section
The grey line between the two sections can be dragged to get a better overview of the users:
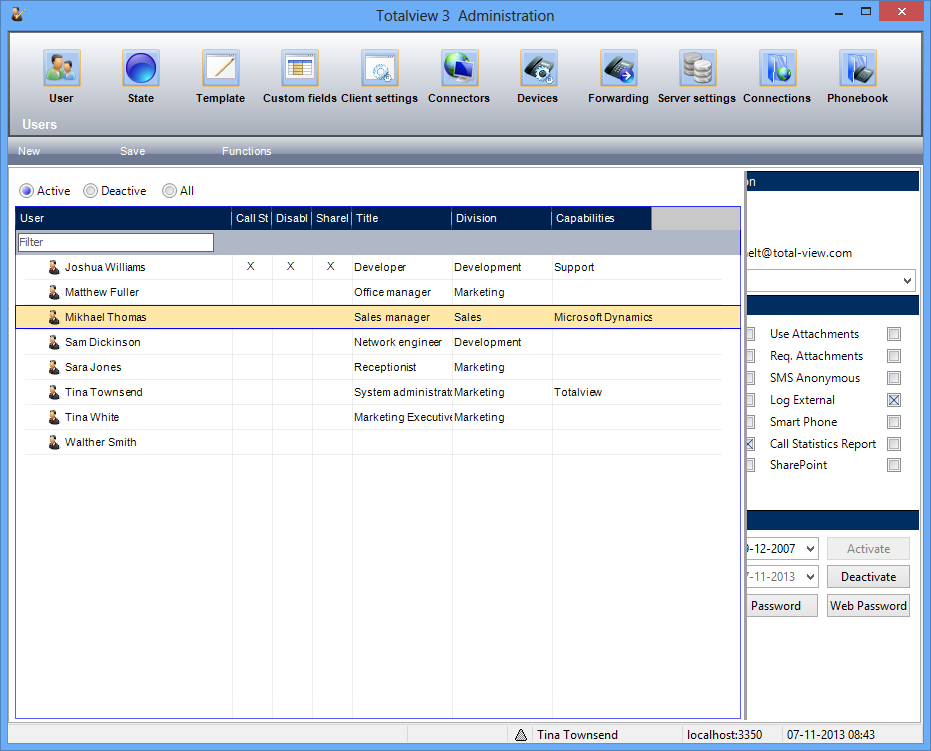
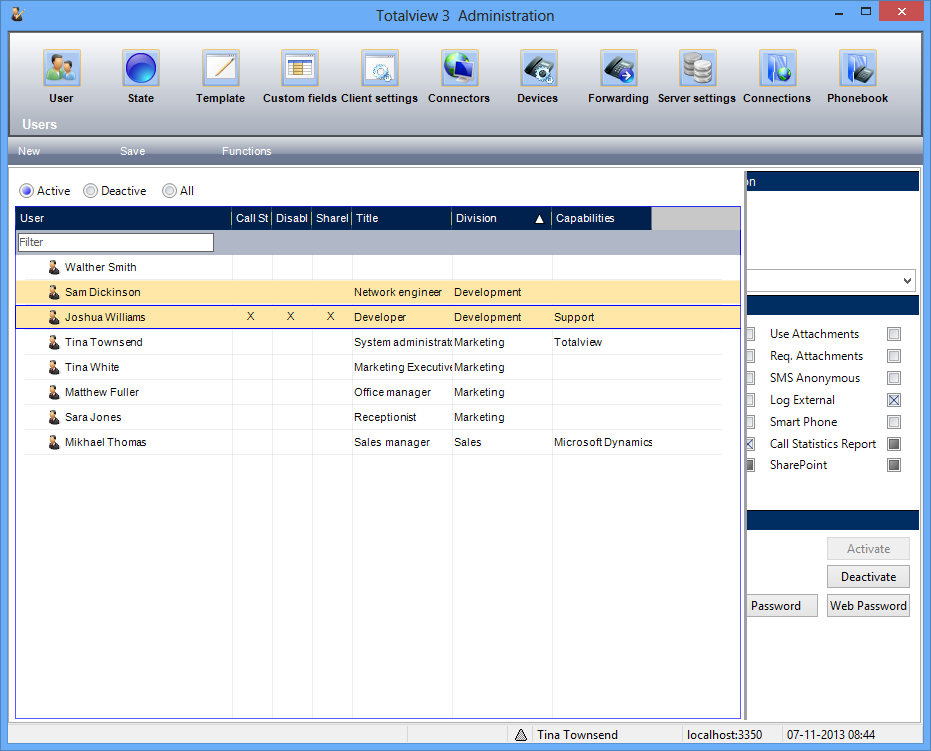
Use right left arrow to scroll horizontally in the overview grid. To sort by a particular column click on the header. Sorting can also be used to group all that have common properties:
To select multiple users either click on one and then hold shift down while clicking another - thereby selecting all users between the two. It is also possible add a single user to the multi-selection by holding down Ctrl and clicking that user.
User detail section
The right section is split into subsections where changes can be made to user(s). Exactly which fields are shown varies with what is selected in the user-list. In the screenshot above, a single user is selected and his details are shown.
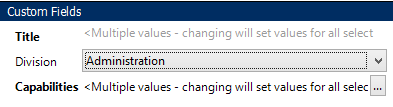
When multiple users are selected the details section will only show values that are common to all users:
If a custom field is changed when multiple uses are selected all the users will be given the new value. In multiple selection, the check-boxes can have three states:
Unchecked, checked and grayed. When the box is checked or unchecked all in the selection are checked/unchecked. When it is grey some are checked and some unchecked.
Checking/Unchecking a checkbox in multi-selection mode will check/uncheck for all users in the selection.
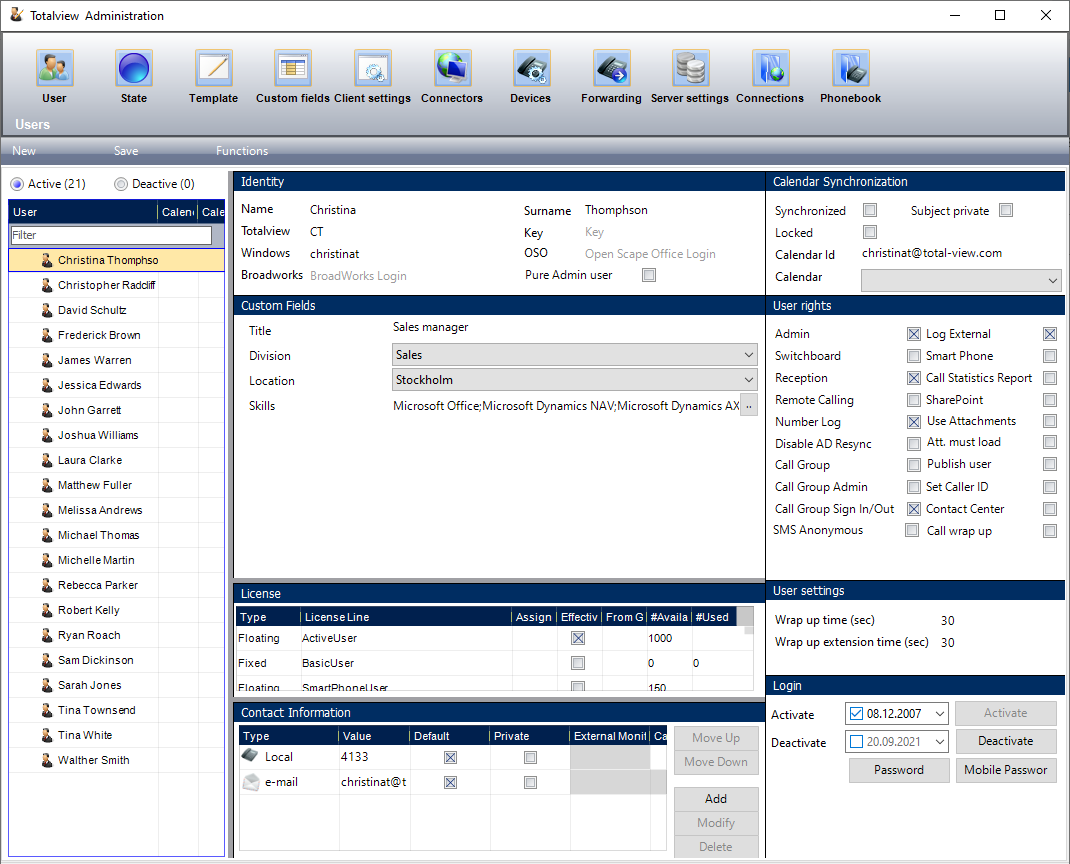
User detail information
Identity
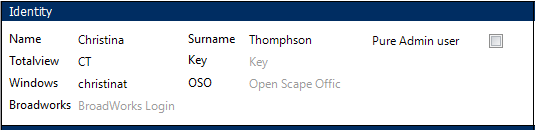
Name, Surname |
The user’s first, middle and last name. The name is used when users are presented in the client. |
Totalview |
The id is the user’s login to the system and must be unique. |
Windows |
The user’s Windows login id. Used when WinUser login is enabled in the shortcuts. (See: Setting login info in the shortcut) |
Broadworks |
The user’s Broadworks ID, e.g. number@broadworks.com. More than one ID can be entered by separating the values with ; (semicolon) or , (comma). |
Key |
The user’s login key identifier when using access systems like CardAccess to login to Totalview. When using keys for login the password for the user is not evaluated. The reader must be setup to prepend a special character to the login and execute the return. See appendix VI. |
Pure Admin user |
A pure admin user can only log into TotalviewAdmin and is not occupying any license. AD synced users can not be pure admin users. |
Custom fields

Custom field values for the user. Custom fields are set up according to the company’s need for registering various user details. (See: The Custom Fields view) for more information about custom fields.
Contact information
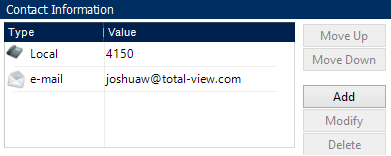
The contact info lists the various ways of contact possibilities for a user.
There are predefined functionality defined for each type of contact info, e.g. call control for local devices or send SMS for mobile devices.
Call control and monitoring of local devices require that a HiPath connector is installed.
Sending SMS messages requires that the SMS connector is installed.
Monitoring mobile devices using provider services require that a mobile connector is installed.
Move up |
Move the selected item up in the order. This will change the order in which the list is displayed in the clients. |
Move down |
Move the selected item down in the order. This will change the order in which the list is displayed in the clients. |
Add |
Insert a new item - this will display a new window to enter details into. |
Modify |
Modify an item - this will display a new window to enter details into. Double-click on an item will also trigger the modify window. |
Delete |
Delete an item. |
Add/Modify window
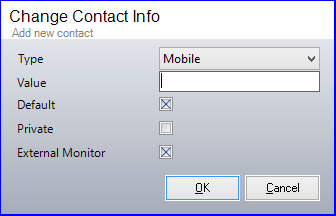
Contact info type:
Local |
Local devices are devices defined on the attached HiPath. Local devices are monitored and call control can be used. The monitoring enables Totalview to show when the devices are idle, busy, queued etc. Call control enables Totalview to answer calls, clear calls, deflect calls etc. The functionality call, answer, forward, DND etc are attached to local devices. |
Mulap |
[HiPath] Mulap numbers are Mulap groups defined on the attached HiPath. When “Mulap monitoring” is not activated on the HiPath/OSB, the Mulap numbers cannot be monitored directly, but the group members can be monitored. When defined, the Mulap number is presented as the user’s primary number instead of the default local device. The monitoring of the Mulap members enables Totalview to show when the Mulap group is idle, busy, queued etc. The Mulap members must be defined as local devices for this to work properly. If “Mulap monitoring” is activated on the HiPath the Mulap number must be registered as a Local device. “Mulap monitoring” is always active when using OpenScape Business. See also the “Mulap monitoring” section. |
Mobile |
Mobile numbers are default set up for external monitoring. Mobile devices can also be monitored using mobile connectors. This kind of monitoring enables Totalview to show the current mobile status. The level of detail depends on the mobile operator services provided. The functionality call and send SMS are attached to mobile devices. |
Home |
Home numbers are default set up for external monitoring. The functionality call is attached to home devices. |
Work |
Unlike Mobile and Home device, work devices are not monitored. The functionality call is attached to work devices. |
Fax |
No functionality is attached to a fax device. |
The functionality Send mail is attached to mail types. |
|
Web |
The functionality Goto homepage is attached to web types. |
Other |
Generic values added to a user. Functionality depends on the values added. Local->Number, e.g. 4095->34404095: When present calls alerting on the Local device are blind transferred to Number. The idea behind the functionality is to show the transferring number on the external phone when the call arrives at Number. See: “Transfer enabled devices“. N.B. This functionality is only available for Broadworks users and requires that Local device is a physical phone. |
Contact info settings:
Default |
When registering several items of the same type, one of the items is set as the default item. The default item is used when a certain item type is required, e.g. when forwarding local device to a user’s mobile device, the user’s default mobile device is used |
External monitoring |
Select if the mobile or home number should be monitored using PBX trunk monitoring or using mobile provider services. If not checked no state is shown for the mobile or home number. |
Private |
Select if contact information should be visible to other users. If checked the contact information is only visible to the owner user. |
Caller ID Target |
Only available for specific PBX types. See here. Select the local device as target when setting the outbound caller ID. If no device is selected as target then the outbound caller ID is set for the default local device. |
Calendar synchronization
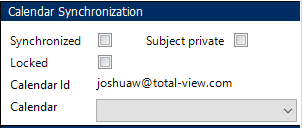
Synchronized |
If running with a calendar connector and this user’s appointments should be synchronized with the calendar system, then this checkbox must be enabled. |
Locked |
If set, the values Synchronize, Calendar ID, and Calendar cannot be changed. This is to prevent accidental changes of these values. |
Subject private |
If set, the appointment subject and location is only visible to the owner of the appointment. Other users see the state caption and an empty location |
Calendar Id |
If this user is set to be synchronized with a calendar system, then the calendar id is used to identify the user in the external system. This normally is the users default SMTP mail address. If the user has multiple calendars, the calendar to use can be specified by adding two || (pipes) after the calendar ID. E.g. if using calendar2, the Calendar ID can be specified as user@domain||\calendar\calendar2. |
Calendar |
If there are more than one calendar connector to synchronize against then the Calendar is used to identify the connector to use for this user. The Calendar does not have to be set if only one calendar connector exists. |
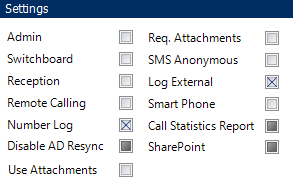
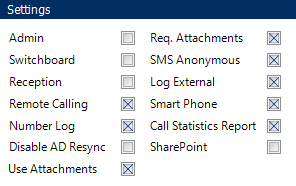
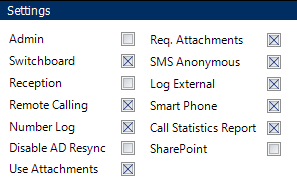
Settings
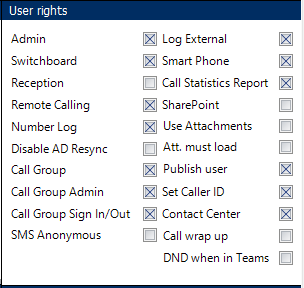
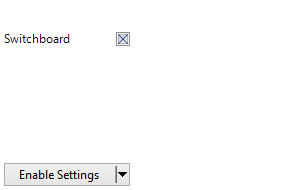
Admin, Switchboard, Receptionist |
Set the appropriate rights for the user. When logging on to the admin, switchboard or receptionist the permissions are checked and if not applied the login fails. Access to the ordinary client does not require any special permission. |
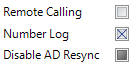
Remote Calling |
Set if the user is allowed to enable remote calling. When remote calling is enabled, calls from the Totalview client can be established from a remote device through the PBX and to a called device. |
Number Log |
Set if logging of in and outgoing calls should be logged for this user. Number logging is dependent on Number logging enabled being enabled in the Server settings. |
Log External |
If not set then outgoing external calls are not logged. Log external is dependent on Number log being enabled. |
Use Attachments |
If user should enter additional information when changing state. Only used with Totalview Time. |
Att. must load |
The user cannot change state unless attachment information is available. Only to be used with Totalview Time. |
SMS Anonymous |
Set if you want to send a text message (SMS) from Totalview without your default mobile number being shown to the receiver. |
Smart Phone |
Set if the user is allowed to log on with smart phone, e.g. IPhone and Android app. |
Call Statistics Reports |
Set if the user is allowed to access the call statistics reports. |
SharePoint |
Set if the user can use the SharePoint components. |
Publish user |
Enable publishing of user when using the Totalview external publish web service. |
Call Group |
Set if the user is allowed to use the Call Group functionality in the smart clients, basic client, receptionist or switchboard. Not supported by Unify |
Call Group Admin |
Set if the user is allowed to see all call groups and add (only for specific PBX types. See here) or sign users in/out of a specific call group. Not supported by Unify |
Call Group Sign in/out |
Set if the user is allowed to sign in/out of call groups. Call Group Admin users always have sign in/out rights. Not supported by Unify |
Set Caller ID |
Only available for specific PBX types. See here. Set if user is allowed to change the Outbound Caller ID of the local device, either explicitly from Phone Settings or while using change state and appointments. |
Call Wrap Up |
Only available for specific PBX types. See here. Set if call wrap up dialog should be shown in Contact center client when call ends. |
DND when in Teams |
Only available for specific PBX types. See here. Set if DND should be active on local device when user is in a Teams call |
User Settings
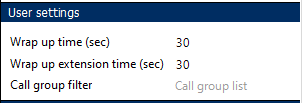
Call Wrap up time |
Only available for specific PBX types. See here. Number of seconds the user is set in wrap up mode after a call is ended. Only available when running Contact center client. Requires the “Call wrap up” user right. |
Call Wrap up extension |
Only available for specific PBX types. See here. Number of seconds the wrap up can be extended. Only available when running Contact center client. |
Call Group Filter |
Comma separated list of call group the user can view. If empty, then user can view all call groups. The list may contains single call groups or intervals, e.g. 100,200-300. |
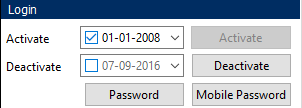
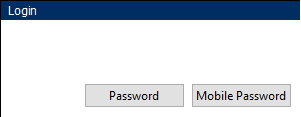
Login

Activate/Deactivate date |
Use this information to automatically activate or deactivate a user. The Totalview server checks the activate/deactivate date each day at midnight, and based on the date the user is activated or deactivated. The rules for activation/deactivation are: If the Active date is empty(not checked) or the date is prior to current date, the user is active (however it depends on the Deactive date setting) If the Active date is after current date, then the user is inactive If the Deactive date is prior to current date, the user is inactive |
Activate button |
Pressing the Activate button will activate the user by setting the activation date to today’s date and the deactivation date to empty. |
Deactivate button |
Pressing the Activate button will activate the user by setting the deactivation date to today’s date and the activation date to empty. |
Password |
Specify the user’s password for the Totalview normal, switchboard, reception and admin client. |
Mobile Password |
Specify the user’s password for the smart phone clients. |
Multi-selection
The fields in multi-selection and single selection behave in the same manner but altering them in multi-selection applies the value to all the selected members.
Identity
It is not possible to alter the identity of multiple users in multi-selection mode.
** Custom Fields**
If the selected users have different values for one custom field the caption will be in bold and the text will show that the values are different. If all selected users have the same value the caption will be in normal font and the common value is displayed.
Changing the value of a custom field will change the value for all selected users.
Contact information
It is not possible to alter the contact information of multiple users in multi-selection mode.
Calendar synchronization
Changing Synchronized, Locked, Subject private and Calendar will change the setting for all selected users. It is not possible to change the Calendar Id in multi-selection mode.
Settings
The checkbox is greyed when the users in the selection have different values. Checked/Unchecked when all members have the property checked/unchecked.
Changing a property will change it for all selected users.
Login
If the Activate button is disabled all the users in the selection are disabled. If the deactivate button is enabled all users are active. If some users are activated and some deactivated both are enabled.
Pressing Active/Deactivate will activate/deactivate all the selected users.
Password/Mobile Password will reset the password for all selected user.
Active Directory Integration
To use Active Directory integration an Active Directory connector must be set up and started.
Select users for synchronization
When you start the users view it will request the server for Active Directory information. While the data is being loaded the Select AD Users menu item will be disabled and (Loading…) is appended to the caption.
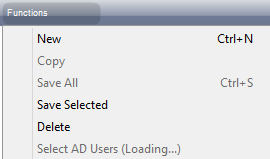
When loading is complete the menu item will be enabled:

Press Select AD Users and the selection view is displayed:
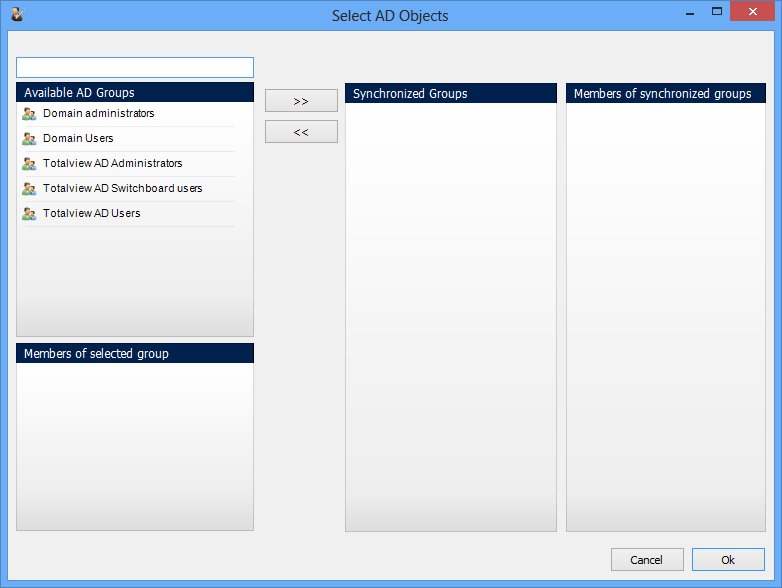
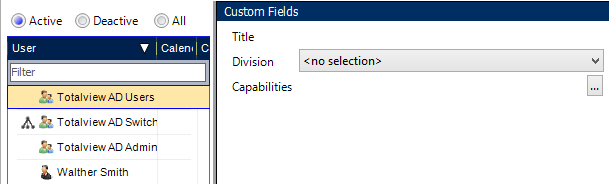
Available AD Groups show the Active Directory groups that are available for synchronization. Clicking on a group displays the members in Members and selected group:
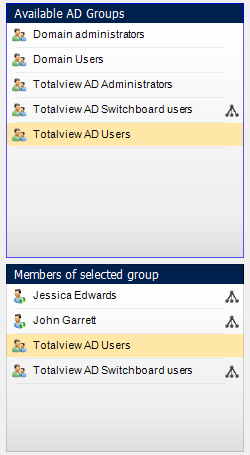
Jessica Edwards and John Garrett are members of Totalview AD Users. Also the Totalview AD Switchboard users group is member of the Totalview AD Users group.
Please note that both direct and indirect members are displayed. If for example John Garret was member of Totalview AD Switchboard users but not Totalview AD users he would still be displayed in the Members of selected group list.
Demonstration data
The active directory setup that is used in the demonstration data is:
Totalview AD Users (group)
Jessica Edwards
John Garret
Totalview AD Switchboard Users (group)
Jessica Edwards
Totalview AD Administrators (group)
Jessica Edwards
It is entirely possible to have person in several AD groups and therefore Jessica Edwards is shown several times.
Add AD groups to Totalview
Either double click on a group or select it and press >> button to add it to the synchronization.
If a group is indirectly added it will be removed from the Available AD groups list. Therefore to add the Totalview AD Switchboard Users group it must be added before the Totalview AD Users group (Parent of Totalview AD Switchboard Users) is added. The group will NOT be added automatically by adding the Totalview AD Users group.
Double click on an added group or select it and press << button to remove it from the synchronization.
When Totalview AD Switchboard Users, Totalview AD Users and Totalview AD Administrators is added the result is:
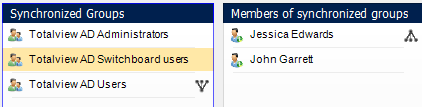
The Synchronized Groups list show all included groups and Members of synchronized groups shows all users in all the synchronized groups.
When a group is selected an indicator show other items relationship to that group. In this case Totalview AD Users is a parent of Totalview AD Switchboard users and Jessica Edwards is a member of it.
Press Ok to finalize the AD selection.
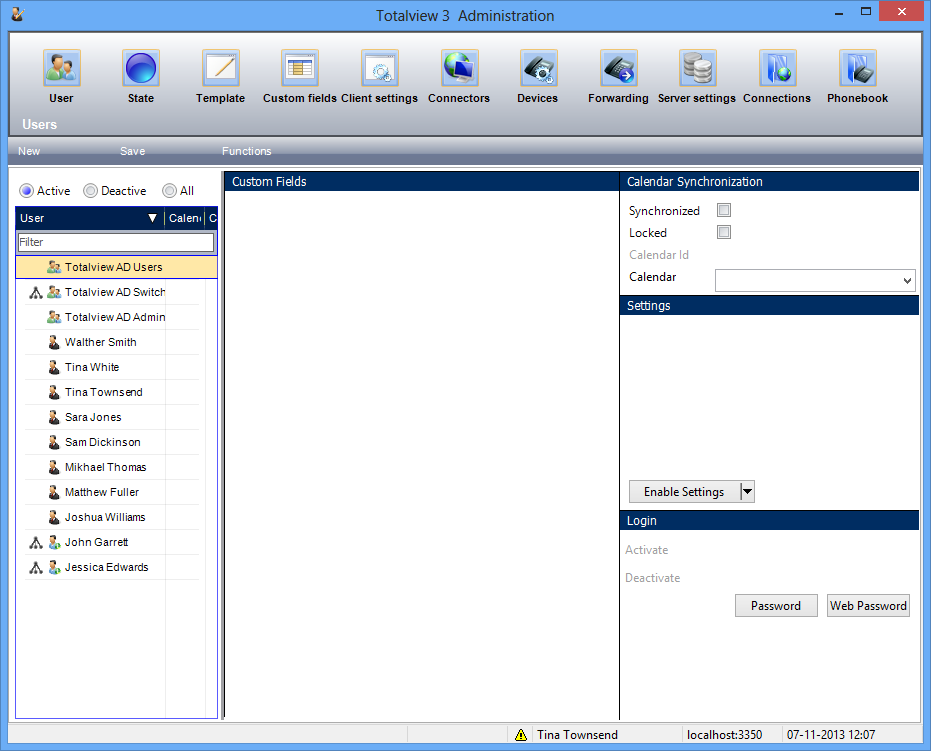
The Active directory users (green) and groups (green and blue) and the normal Totalview users (black) are all displayed in the user-list. Also the same indicator is displayed for parent/child relationships. The red dot indicates that there are changes that should be saved.
Please note that it is not possible to multi-select active directory groups.
It is possible to alter settings for a single Active Directory user, but in many cases this is not to be recommended since a resynchronization might overwrite those settings. In general the setting should be set on the group and if some details (like name, contact details etc.) are incorrect they should be corrected in the Active Directory.
Custom Fields
Default setting are to assign custom field pr. active directory user in the same way as for a normal users, but it is also possible to assign custom field pr. active directory group. To assign a custom field by Active Directory the Synchronize AD flag must be set in the Custom Fields. (See: The Custom Fields view)
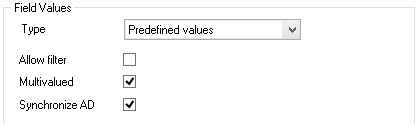
When the Synchronize AD flag is set the User View will show it when an Active Directory group is selected.
If the custom field allows multiple values (Multivalued in Custom Field view) Active Directory users will be assigned all the values of all the groups they are member of. If multiple values is not set the value of one of the users groups will be used.
Sample
Group settings:
Capability |
Totalview |
Switchboard |
Totalview AD users |
X |
|
Totalview AD switchboard users |
X |
Result users:
Capability |
Totalview |
Switchboard |
John Garrett |
X |
|
Jessica Edwards |
X |
X |
(Jessica Edwards is member of both TVAD Users and TVAD switchboard)
Calendar synchronization
If a user is member of any Active directory group that has Synchronized, Locked or Subject private flag set the user will also have the flag set.
If a user is member of any Active directory group that has Calendar assigned the user will get the value of one of the groups. A users should not be in two groups that have different Calendar values.
Settings
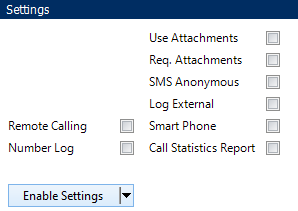
Default a group will not assign setting to its members. To enable a group to control settings for a group select it by pressing the down arrow. To easier enable multiple settings button or press the button.
If a user is member of any group that has a particular setting enabled and the group has the value checked the member will also have the value checked. If groups have the setting enable but none of them have the value checked the user will not have the value checked. If no group has the setting enabled the setting is controlled on the user itself. So if the value should be checked select the user and check it.
Sample
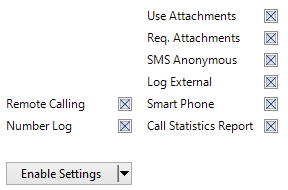
And the Totalview AD Switchboard Users to:
Will make John Garret (member of TVAD only) have these settings:
And Jessica Edwards (member of TVAD Users and TVAD Switchboard) have these settings:
The Disable AD Resync setting will stop the AD synchronization from modifying the user. The user will in effect behave like a normal Totalview User.
Login
It is not possible to Activate/Deactivate AD users or groups - to deactivate them they must be removed from the synchronization.
Normally the Password/Mobile Password are not changed by the synchronization. Assigning a Password/Mobile Password to an AD Group will change the Password/Mobile Password for all the members. This can be used to set a default password.
Contact Information
If contact information for a user is modified in the Active Directory it will be added as a new entry in the Contacts list. The synchronization will not modify/delete existing information. This is to enable the user to control details (Default, Private, External Monitor and order) in their Totalview client. Also this makes it possible to add new items without losing them the next time the synchronization is run.
Identity
When a user is imported the identity properties will be synchronized to Active Directory settings. However only name, surname and windows login will be resynchronized. In other words if Totalview id, BroadWorks id, Key and OSO id are modified in Totalview they will not be overwritten by the synchronization.
Active Directory Import
Selecting which groups and users are available for synchronization
The connector will start searching the Active Directory in the path that is assigned in LDAP address in the connector configuration. If no LDAP address is specified the entire domain will be searched.
It will find all distribution groups (groups that are not security groups) and all users (object class=user and object category=Person) at that location. It will then find all users and distribution groups that are the result set and continue until no more users or groups are found. Please note that since it resolves all the groups into members it will find users/groups that are outside the scope of the original LDAP path if any group has members that are outside that scope.
The simple way in a small domain is to leave the LDAP path blank. If more controls is required the LDAP path can be the path of a “Totalview Objects” group and then add everything that is relevant to Totalview to that group.
Keeping it simple
Even though it is possible to control each setting by having a group for it will be cumbersome at best, the simple way is to decide which properties are common and then have as few groups as possible. If for example all Totalview users have Remote Calling, Number Log, Log External and Smart Phone rights then the simplest way is to have a group call Totalview and give those rights to every member in the Totalview group. Create another group Switchboard operators and one for Totalview Administrator and add those groups to the Totalview group and set Switchboard / Admin rights on them.
If the Active Directory already contains structure, such as division, that should be shown in Totalview then those can be added and set to control the Custom Fields only.
If only part of the users are included in the calendar synchronization then a “Totalview Calendar Synchronization” group can be added and it can control the Calendar Synchronization part. Same if there are multiple calendar providers then an AD group can be created for each and it can control the Calendar field.
It is not recommended to create a group for each setting since it will be too difficult to add a user to AD since it must be added to each setting group.