Specifying Your State
Aside from viewing your current state information, the My State view gives you the possibility to specify your state by clicking on it. Depending on the type of state, you may have to enter additional details.
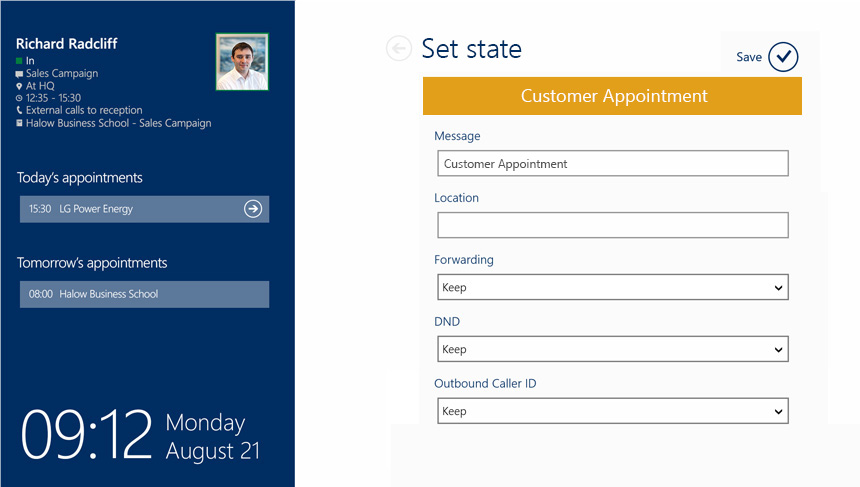
Generally, there are two types of states: Normal states and quick states. Normal states require you to attach additional information to your registration. You can identify them by the arrows next to their name. Clicking on these states will open an additional screen where you need to type in the extra information, such as message, location, expected end time, etc. :

Expected end time
When creating a state registration with required end time, you will be asked to enter the expected end time in the field “End Time”. That way, colleagues can get an idea when they should be expecting to reach you again. Depending on the state settings in Totalview Admin, the state will continue or the next state will be executed when the end time is reached.
It is not possible to directly set a “Next State” in the Doorway client. However, when choosing a state with a template that contains an automatic next state, it will be executed anyway.
Message
You can use the “Message” field in order to specify the details of the state (e.g. “Dentist Appointment”, “Marketing Presentation”, etc.).
Location
The location field can be used to detail your whereabouts. Note that it is not required to set this field. If no location has been specified, the field will not be shown in the My State view.
Phone Forwarding
When making a state change, you are able to define your forwarding settings during the time of the state for your local device. You can usually choose between:
Do not forward
Keep current
All calls to Mobile (i.e. your mobile number)
Additionally, administrators can set up additional forwarding options in the Totalview Admin (e.g. “External calls to Reception”, “All calls to Reception”, etc.).
Do Not Disturb
The Do Not Disturb (DND) setting allows you to cut off any incoming calls that should reach your local device, playing a busy sound to any caller. In order to specifiy DND click on the DND field and select either “Keep”, “On” or “Off”.
Outbound Caller ID
Totalview allows you to change the caller ID (i.e. phone number) that is shown on a receiving device when you make a phone call via your local device. When specifying a state registration, you can find this setting by clicking on “Caller ID”. You will then be presented with a list of options. While these options depend on your particular setup and use of templates, the following are usually present:
Keep - No changes are done with regards to Outbound caller ID
Work - The Outbound Caller ID is set to the user’s default work number
Mobile - The Outbound Caller ID is set to the user’s default mobile number
Hidden - No ID is shown
Note that Outbound Caller ID requires the use of 3CX, One-Connect or Broadworks with Mobility enabled.
Work Specification
The Totalview Doorway client provides you with the possibility to detail the project or job you are working on. You can find it in the section “Work Specification”. Simply select your work options from the top and down in order to specify your current work.
In order to use Work Specification, it has to be enabled in the Totalview Admin.
Call Groups
Requires the Totalview user to have “Call Group” rights, and have atleast one call group associated with the user.
The Totalview Doorway client gives you the possibility to use the call group sign in/out functionality with ease. You can find it under the section “Call Groups”, simply select: Keep, Sign In or Sign Out.
In order to use the call group sign in/out functionality, Call Group Sign In/Out has to be enabled for the specified user in Totalview Admin.
If Call Group Sign In/Out rights are missing from your user, the specified call groups associated the state template, will be greyed out and use the state’s template default setting.
In versions older than Totalview 2021, “Call Group Sign In/Out” rights does not exist, therefore “Call Group” rights will suffice.
